Tuesday, June 30, 2009

Share Files on PC through Gmail using g2Peer

Most of the time when we want to share some files with your friends, we either sent as attachments in email or use file sharing services like Dropbox or online file sharing sites. These sites need the files to be uploaded to their server in order to be shared.


g2Peeris a new utility which allows you to share files on PC through Gmail without having to upload any file online or to your Gmail account. Gmail address is served as unique “IP address” of PC in g2Peer network.


Once installed, you need to login with your Gmail account and use either POP3 or IMAP. Once you have configured your account, you can share files by adding the folders and users with whom you want to share files. You can do this by selecting Share under the tools menu.


Share files


In the share settings, add the Gmail account with whom you want to share files and also the folder in your PC which needs to be shared.


Add account to G2P


Once you have configured, the person who wants to download the files from your PC, needs to install this application and need to enter the your email address and select Go, all the files in the shared folder are displayed and you can select the files and right click to download them. Please note the files are only displayed, if your email address is listed in the PC where you want to download.


Download Files


You can also use command line parameters to download the files using email. To get shared files from Computer 2 it is not necessary to install g2Peer on Computer 1. Just use commands like ?_list or ?_download sent from your Gmail account to Computer.2 Gmail address. Computer.2 should have g2Peer installed and your Computer 1 Gmail address listed in Share Folders list.


Detailed information on how to use g2Peer is available here.

Download g2Peer

Monday, June 29, 2009

Kaspersky Internet Security 2010 and Anti-Virus 2010 Released

Kaspersky Lab has released the latest version of Kaspersky Internet Security 2010 and Kaspersky Anti-Virus 2010. Kaspersky Internet Security 2010 provides a safe and secure Internet experience and Anti-Virus 2010 offers PC security system, offering protection from a range of IT threats. The Internet security suite has all the features and technologies of Kaspersky Anti-Virus 2010.


kav2010_eng_big kis2010_eng_big


The new version 2010 products incorporate the advantages of advanced Host-based Intrusion Prevention System (HIPS) technology in the Application Control module that assigns a security rating to previously unknown malware; unique Sandbox technology embodying virtualization technologies and providing a dedicated secure runtime environment; and the innovative Kaspersky Security Network that uses information from millions of users to dramatically reduce response times to new threats and replenish reputation databases with the most up-to-date information about clean and infected files.


The interface of personal products has undergone a major change making it more user friendly. There is also an automated application mode has been implemented in Anti-Virus 2010 and Internet Security 2010 that chooses the best options without bothering the user with unnecessary and annoying requests for action.

All the components available in earlier versions have been improved and upgraded, including the firewall, heuristic analyzer, parental control module, and the anti-spam module as per the Kaspersky Labs.


Kaspersky Anti-Virus 2010 and Kaspersky Internet Security 2010 were developed with Windows Vista in mind, making them fully compatible with that operating system.


=>Download Free Trial Internet Security

=>Download Free Trial Anti Virus


Quote of the day:
Good taste is the worst vice ever invented. - Edith Sitwell

Monday, June 22, 2009

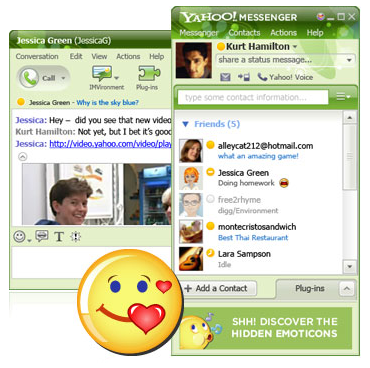
Download Yahoo Messenger Standalone Installer Full Setup Latest Version [Offline Installer] Direct Download Links

Yahoo! Messenger one of the best and widely used Instant messaging tool which allows you to quickly exchange messages with your online friends.


By downloading the Yahoo! Messenger application to your computer, you can send instant messages to other people from around the globe who have a email account at yahoo, send them files or have a voice conference when ever you like to.


yahoo_messenger_9


But when you go to download yahoo messenger from its official page here, you will get a small web installer which would first download and install yahoo messenger on your computer. This means every time you install yahoo messenger with that web installer your internet bandwidth will be wasted.


In order to download the full setup offline installer for yahoo messenger 9 latest build version follow the post further.


Here is the download link to get the latest version of yahoo messenger 9 latest build


Click the link below:-

Download Standalone Offline Installer Yahoo Messenger 9.0.0.2162

Auto Reply For Gtalk, Yahoo Messenger, Msn and AIM etc

Answer.im is one of useful FREE online service which works as a auto reply answering machine for your Instant Messengers like Yahoo messenger, Google Talk, MSN, AIM and ICQ.

This service could be really useful to auto respond to the messages on your instant messengers in case you are away from your computer or busy in doing some other important work.

auto-reply

It works in the following way mentioned below


1. Go to answer.im and Login through your instant messaging account credentials.

answer.im


2. Setup your online account status and type in your answer text and click Save Changes button.

auto-reply-answer


3. Click Exit, to exit but your account will stay online, and respond to messages by your friends.    

exit

This service will auto respond to all the messages by your friends and contact list even if your computer is switched off.

Check out answer.im


Quote of the day:

The artist doesn't have time to listen to the critics. The ones who want to be writers read the reviews, the ones who want to write don't have the time to read reviews. - William Faulkner

Sunday, June 21, 2009

HOW TO: Manage Multiple Social Media Profiles

http://skreened.com/product-image/v2w160h210/erazikaagakuldehabje/my-way-all-day-social-networking-sites.jpgmultiplesocialmediasites

Start counting the number of social media websites you have a profile with, right now. Out of fingers yet? Facebook (Facebook), Twitter (Twitter), Flickr (Flickr), and YouTube (YouTube) are just the start of it – for people active on social websites, you could have several dozen social media profiles, half of them using a really old picture of you. Heck, some of them probably have inboxes filled with strange messages from some girl named “Leota” who wants you to visit her sexy singles website.


While inbox spam and old pictures may not be the end of the world, keeping up a consistent image across the web and keeping your content fresh is vital to good business and strong relationships. With a little upfront effort, the task of maintaining multiple profiles can be less tedious, freeing up time to better connect with other people.


Step 1. Understand your Current Position


The first step is to exactly know where you have a social media profile and where you do not. Start by checking with Check User Names, which will search dozens of popular social media websites to see if your username is active. Check any you normally use. If any don’t ring any bells, see if it’s yours or if somebody already owns.

Tip: Always keep note of other people using your most common username. Making sure people don’t confuse you for somebody else is important for friends and potential employers alike.


Step 2. Choose Your Platforms Realistically


People may disagree with me, but I believe you should sign up for the most popular social networks regardless of whether you are going to use them all. This prevents someone else being mistaken for you and protects an account that you may want to use later.

This doesn’t mean you should be active on all of these services. Take a long, hard look at all of the services available and your time constraints and choose the ones that pique your interest the most. Keep some focus when choosing platforms. For the rest, place a note on your profile with contact information and links to your favorite social profiles.


Step 3. Organize!


This is the most important step! Don’t be satisfied with a disarray of bookmarks and email notifications. Organize a bookmarks folder or two for the social media services you are using. Filter your email so that all of your notifications fall into their own inbox/label. Schedule time to log into these accounts and make sure they are in order.

Tip: The most important thing to remember is to find a system and stick to it. These are the profiles that need your attention consistently; keep them free of spam and outdated information.


Step 4. Automate and Combine Your Profiles


No, I am not suggesting using a bot or having autoresponders. Instead, I am talking about grouping similar tasks together. One of the most common actions on social media is sending an update that you have updated your blog. Normally, you would have to copy and paste this type of message into Twitter, Facebook, and MySpace (MySpace), not to mention Plurk (Plurk), Brightkite (Brightkite), or FriendFeed (FriendFeed).

However, with services such as Ping.fm (Ping.Fm) and Twitterfeed, this can be done without any work on your end. Find tools that can help you spread you reach without eating up your time.

Tip: Atomkeep is a cool tool for updating all of your social media profiles at once – it connects to your Twitter, LinkedIn (LinkedIn), Facebook, and other accounts and allows you to change bios and profile pictures with one action.


Step 5. Keep it Fresh


It’s easy to tell if someone has abandoned an account and left it to grow weeds. If you intend to use a service, keep adding new content! You can’t expect to meet new people on Digg (Digg) or Stumbleupon (StumbleUpon) accounts without digging or stumbling. And it can be confusing for other people if your profile has an old email address or says you’re still in a relationship with your high school sweetheart.

Tip: Use a Firefox (Firefox) extension like Shareaholic to help make adding new content to your profile easier.


Go Forth and Network!


Once you’re organized and understand where you really want to spend your time, managing multiple social media profiles becomes less of a chore and more about sharing experiences, discovering new content, and building new relationships. That is why you made these profiles in the first place, right?